Nacos
Nacos
1 Nacos注册中心
国内公司一般都推崇阿里巴巴的技术,比如注册中心,SpringCloudAlibaba也推出了一个名为Nacos的注册中心
1.1 认识和安装Nacos
Nacos是阿里巴巴的产品,现在是SpringCloud中的一个组件。相比Eureka功能更加丰富,在国内受欢迎程度较高
安装方式可以参考课前资料《Nacos安装指南.md》
1.2 服务注册到nacos
Nacos是SpringCloudAlibaba的组件,而SpringCloudAlibaba也遵循SpringCloud中定义的服务注册、服务发现规范。因此使用Nacos和使用Eureka对于微服务来说,并没有太大区别。
主要差异在于:
- 依赖不同
- 服务地址不同
1)引入依赖
在cloud-demo父工程的pom文件中的<dependencyManagement>中引入SpringCloudAlibaba的依赖:
<dependency>
    <groupId>com.alibaba.cloud</groupId>
    <artifactId>spring-cloud-alibaba-dependencies</artifactId>
    <version>2.2.6.RELEASE</version>
    <type>pom</type>
    <scope>import</scope>
</dependency>
然后在user-service和order-service中的pom文件中引入nacos-discovery依赖:
<dependency>
    <groupId>com.alibaba.cloud</groupId>
    <artifactId>spring-cloud-starter-alibaba-nacos-discovery</artifactId>
</dependency>注意:不要忘了注释掉eureka的依赖。
2)配置nacos地址
在user-service和order-service的application.yml中添加nacos地址:
spring:
  cloud:
    nacos:
server-addr: localhost:8848注意:不要忘了注释掉eureka的地址
3)重启
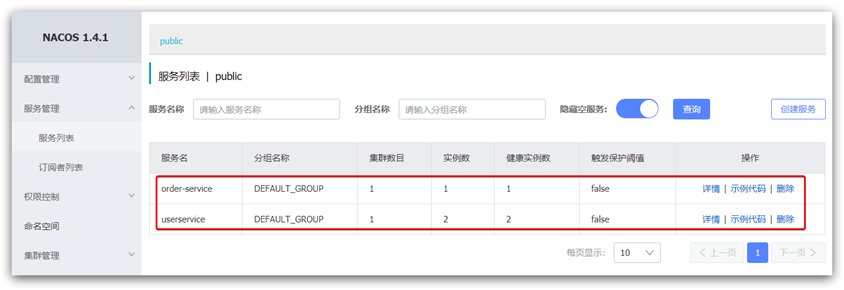
重启微服务后,登录nacos管理页面,可以看到微服务信息:
1.3 服务分级存储模型
一个服务可以有多个实例,例如我们的user-service,可以有:
- 127.0.0.1:8081
- 127.0.0.1:8082
- 127.0.0.1:8083
假如这些实例分布于全国各地的不同机房,例如:
- 127.0.0.1:8081,在上海机房
- 127.0.0.1:8082,在上海机房
- 127.0.0.1:8083,在杭州机房
Nacos就将同一机房内的实例 划分为一个集群。
也就是说,user-service是服务,一个服务可以包含多个集群,如杭州、上海,每个集群下可以有多个实例,形成分级模型,如图:
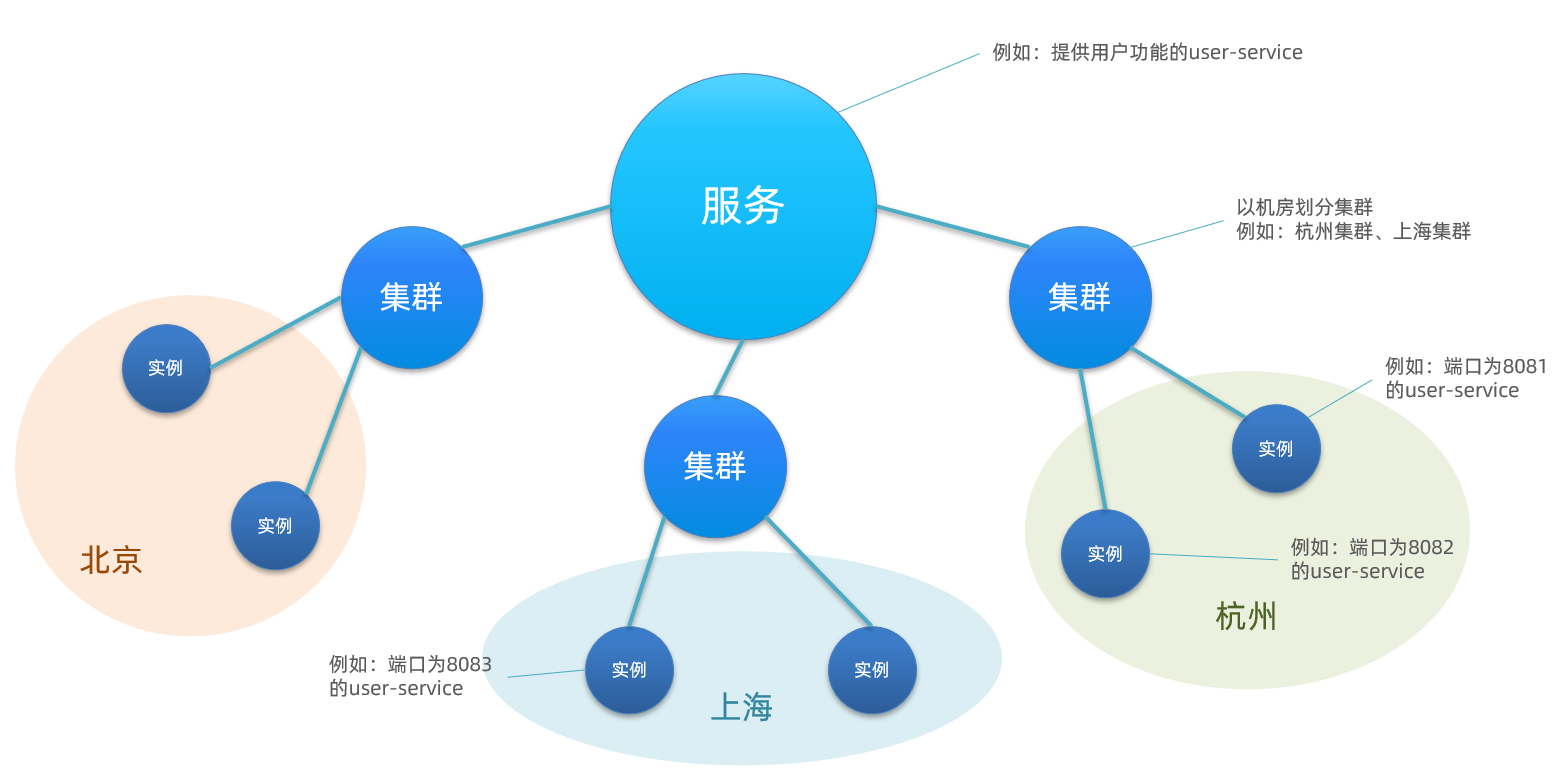
微服务互相访问时,应该尽可能访问同集群实例,因为本地访问速度更快。当本集群内不可用时,才访问其它集群。例如:

杭州机房内的order-service应该优先访问同机房的user-service。
1.3.1 给user-service配置集群
修改user-service的application.yml文件,添加集群配置:
spring:
cloud:
nacos:
server-addr: localhost:8848
discovery:
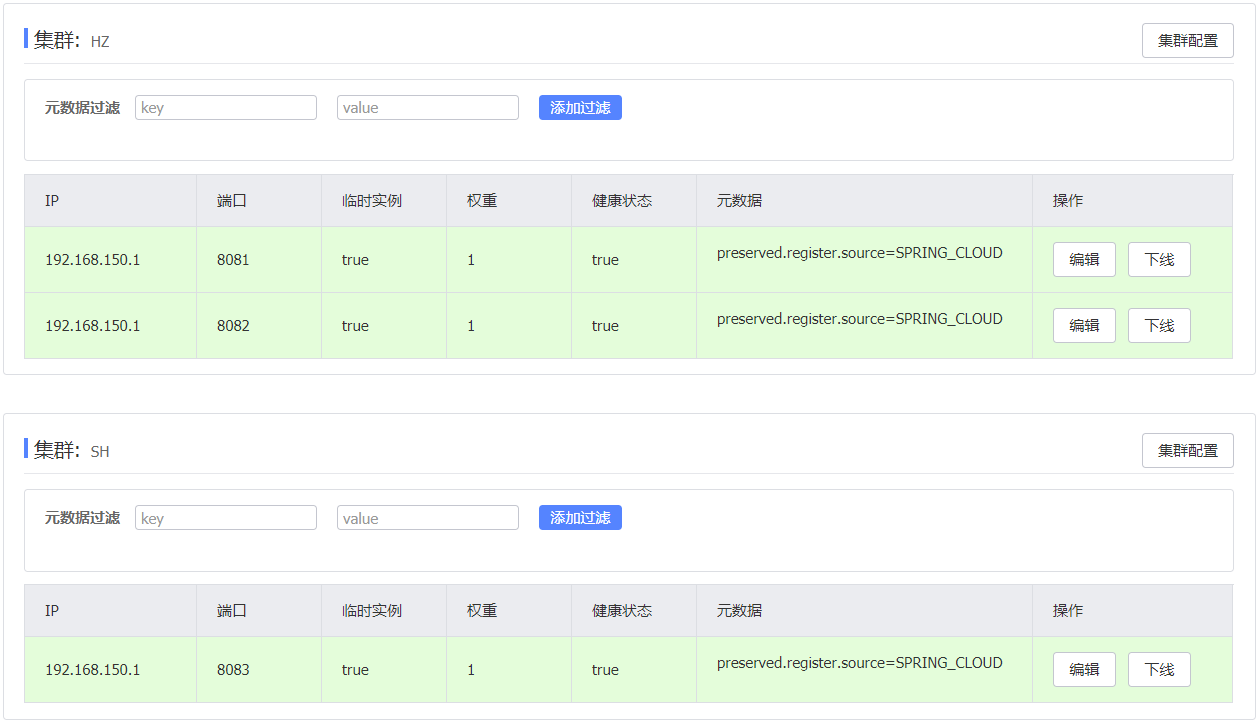
cluster-name: HZ # 集群名称重启两个user-service实例后,我们可以在nacos控制台看到下面结果:

我们再次复制一个user-service启动配置,添加属性:
-Dserver.port=8083 -Dspring.cloud.nacos.discovery.cluster-name=SH配置如图所示:
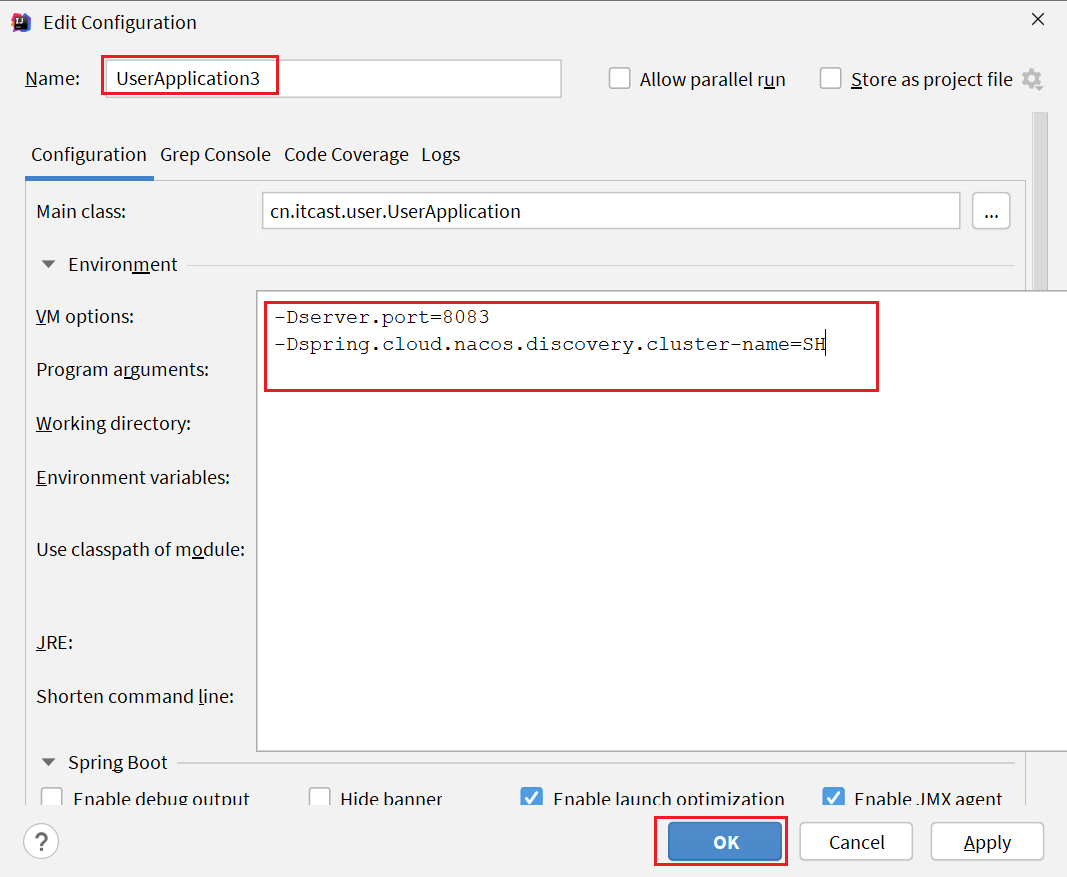
启动UserApplication3后再次查看nacos控制台:
1.3.2 同集群优先的负载均衡
默认的ZoneAvoidanceRule并不能实现根据同集群优先来实现负载均衡。
因此Nacos中提供了一个NacosRule的实现,可以优先从同集群中挑选实例。
1)给order-service配置集群信息
修改order-service的application.yml文件,添加集群配置:
spring:
  cloud:
    nacos:
      server-addr: localhost:8848
      discovery:
        cluster-name: HZ # 集群名称
2)修改负载均衡规则
修改order-service的application.yml文件,修改负载均衡规则:
userservice:
  ribbon:
    NFLoadBalancerRuleClassName: com.alibaba.cloud.nacos.ribbon.NacosRule # 负载均衡规则
1.4 权重配置
实际部署中会出现这样的场景:
服务器设备性能有差异,部分实例所在机器性能较好,另一些较差,我们希望性能好的机器承担更多的用户请求。
但默认情况下NacosRule是同集群内随机挑选,不会考虑机器的性能问题。
因此,Nacos提供了权重配置来控制访问频率,权重越大则访问频率越高。
在nacos控制台,找到user-service的实例列表,点击编辑,即可修改权重:

在弹出的编辑窗口,修改权重:
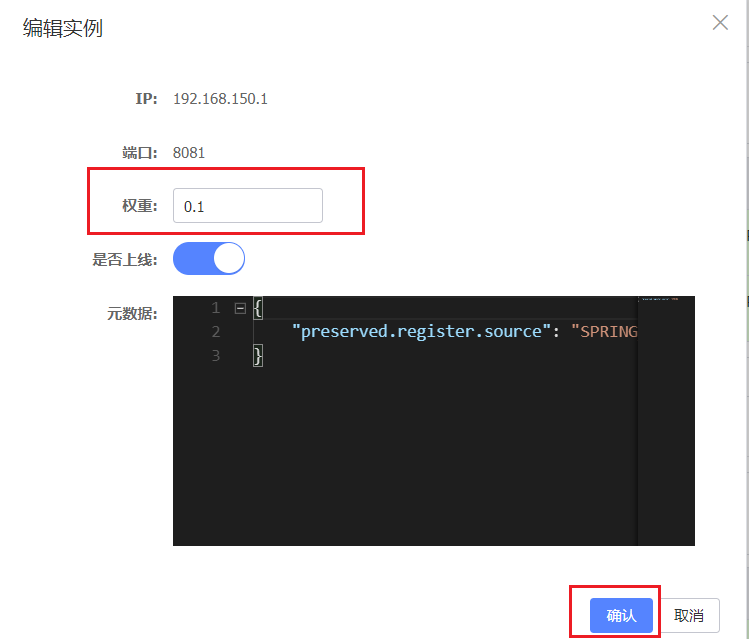
注意:如果权重修改为0,则该实例永远不会被访问
1.5 环境隔离
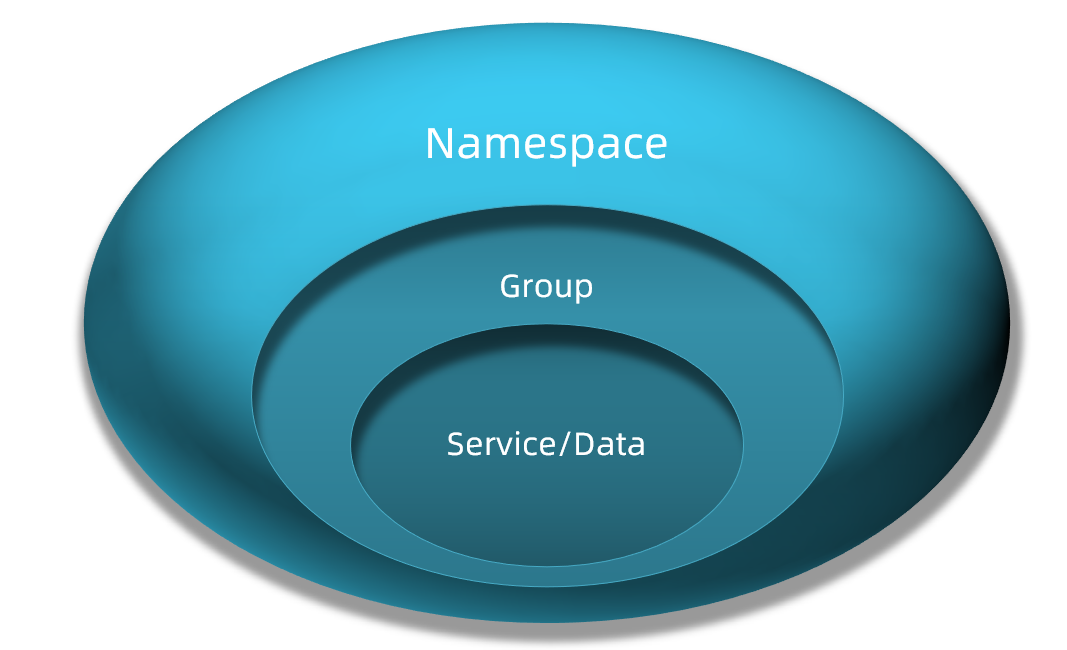
Nacos提供了namespace来实现环境隔离功能。
- nacos中可以有多个namespace
- namespace下可以有group、service等
- 不同namespace之间相互隔离,例如不同namespace的服务互相不可见
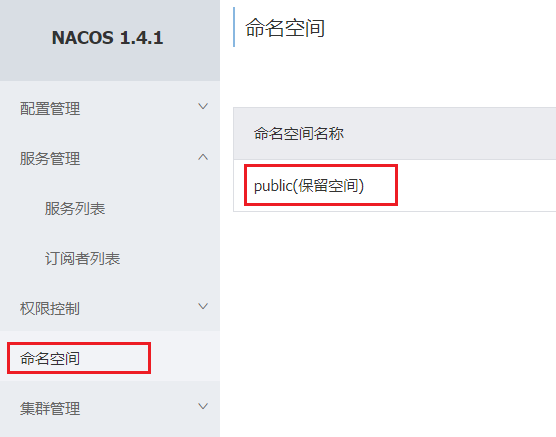
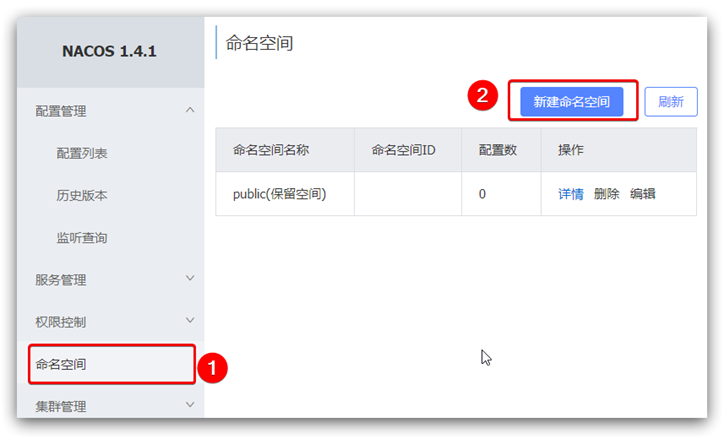
1.5.1 创建namespace
默认情况下,所有service、data、group都在同一个namespace,名为public:
我们可以点击页面新增按钮,添加一个namespace:
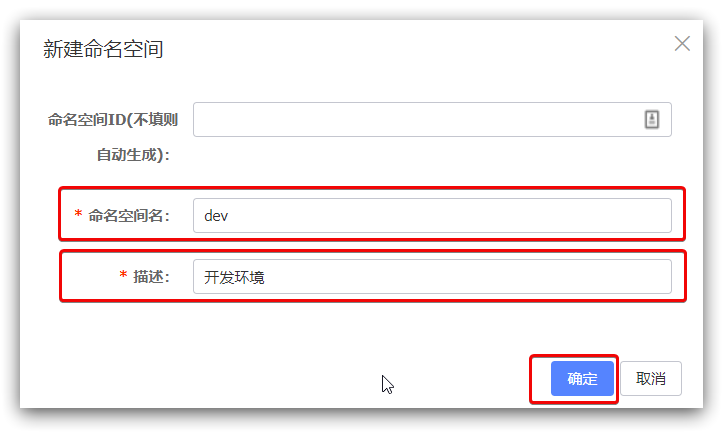
然后,填写表单:
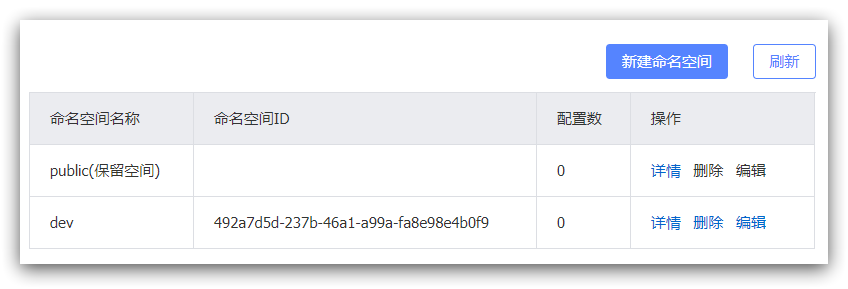
就能在页面看到一个新的namespace:
1.5.2 给微服务配置namespace
给微服务配置namespace只能通过修改配置来实现。
例如,修改order-service的application.yml文件:
spring:
  cloud:
    nacos:
      server-addr: localhost:8848
      discovery:
        cluster-name: HZ
        namespace: 492a7d5d-237b-46a1-a99a-fa8e98e4b0f9 # 命名空间,填ID
重启order-service后,访问控制台,可以看到下面的结果:

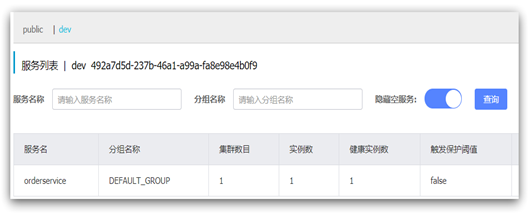
此时访问order-service,因为namespace不同,会导致找不到userservice,控制台会报错:

1.6 Nacos与Eureka的区别
Nacos的服务实例分为两种l类型:
临时实例:如果实例宕机超过一定时间,会从服务列表剔除,默认的类型。
非临时实例:如果实例宕机,不会从服务列表剔除,也可以叫永久实例。
配置一个服务实例为永久实例:
spring:
  cloud:
    nacos:
      discovery:
        ephemeral: false # 设置为非临时实例
Nacos和Eureka整体结构类似,服务注册、服务拉取、心跳等待,但是也存在一些差异:
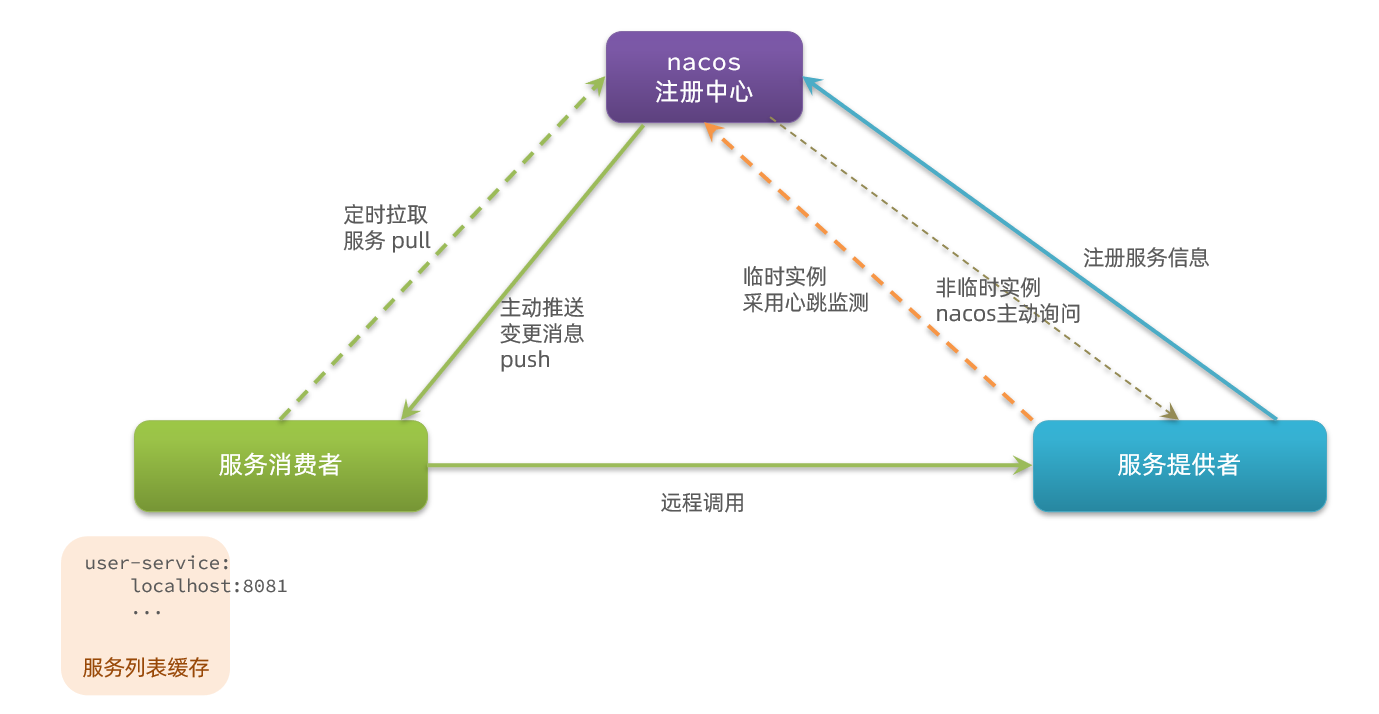
Nacos与eureka的共同点
- 都支持服务注册和服务拉取
- 都支持服务提供者心跳方式做健康检测
Nacos与Eureka的区别
- Nacos支持服务端主动检测提供者状态:临时实例采用心跳模式,非临时实例采用主动检测模式
- 临时实例心跳不正常会被剔除,非临时实例则不会被剔除
- Nacos支持服务列表变更的消息推送模式,服务列表更新更及时
- Nacos集群默认采用AP方式,当集群中存在非临时实例时,采用CP模式;Eureka采用AP方式
2 Nacos配置管理
Nacos除了可以做注册中心,同样可以做配置管理来使用。
2.1 统一配置管理
当微服务部署的实例越来越多,达到数十、数百时,逐个修改微服务配置就会让人抓狂,而且很容易出错。我们需要一种统一配置管理方案,可以集中管理所有实例的配置。

Nacos一方面可以将配置集中管理,另一方可以在配置变更时,及时通知微服务,实现配置的热更新。
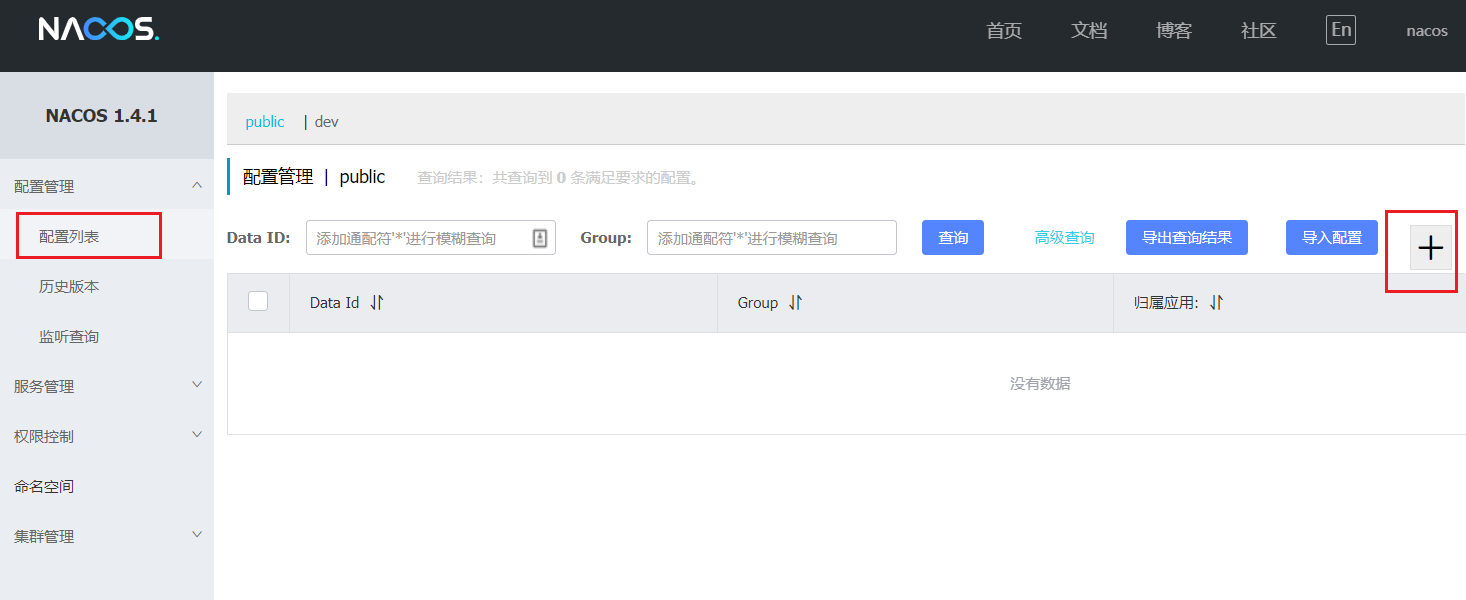
2.1.1 在nacos中添加配置文件
如何在nacos中管理配置呢?
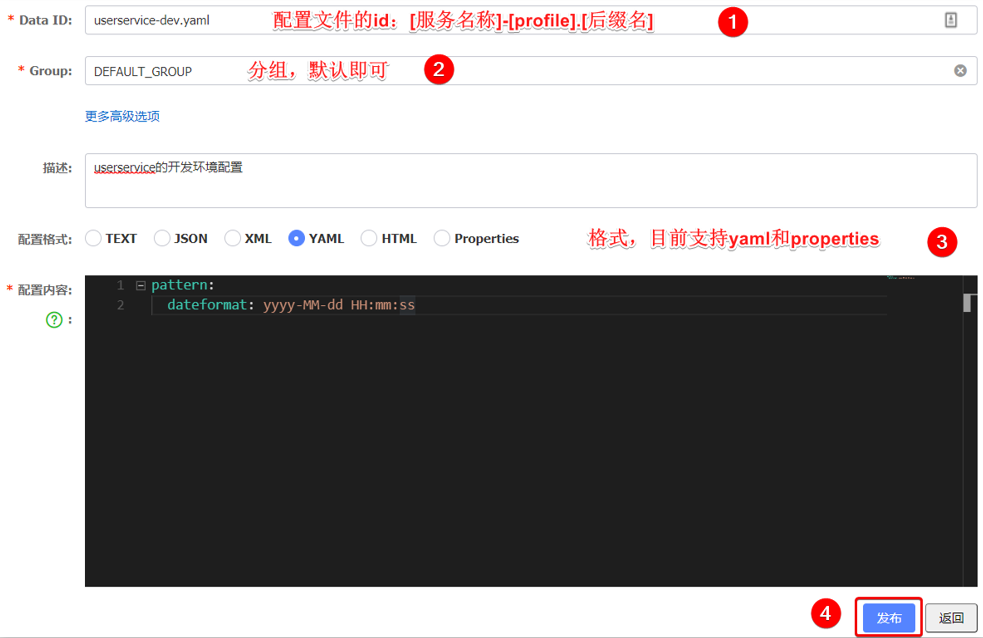
然后在弹出的表单中,填写配置信息:
注意:项目的核心配置,需要热更新的配置才有放到nacos管理的必要。基本不会变更的一些配置还是保存在微服务本地比较好。
2.1.2 从微服务拉取配置
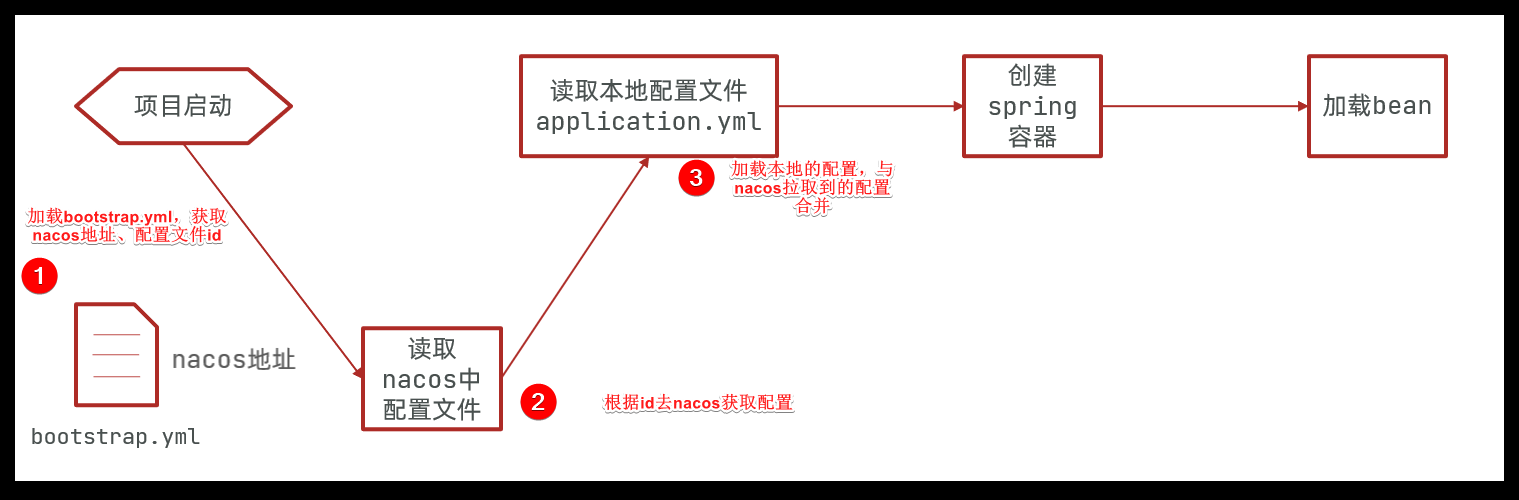
微服务要拉取nacos中管理的配置,并且与本地的application.yml配置合并,才能完成项目启动。
但如果尚未读取application.yml,又如何得知nacos地址呢?
因此spring引入了一种新的配置文件:bootstrap.yaml文件,会在application.yml之前被读取,流程如下:
1)引入nacos-config依赖
首先,在user-service服务中,引入nacos-config的客户端依赖:
<!--nacos配置管理依赖-->
<dependency>
    <groupId>com.alibaba.cloud</groupId>
    <artifactId>spring-cloud-starter-alibaba-nacos-config</artifactId>
</dependency>
2)添加bootstrap.yaml
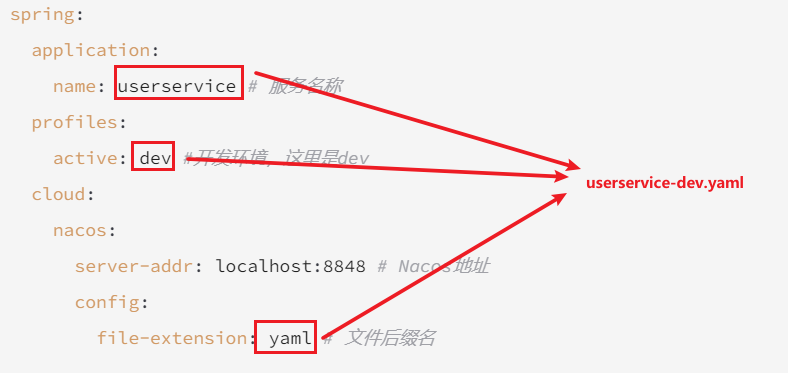
然后,在user-service中添加一个bootstrap.yaml文件,内容如下:
spring:
  application:
    name: userservice #服务名称
  profiles:
    active: dev #开发环境,这里是dev
  cloud:
    nacos:
      server-addr: localhost:8848 #Nacos地址
      config:
        file-extension: yaml #文件后缀名
这里会根据spring.cloud.nacos.server-addr获取nacos地址,再根据
${spring.application.name}-${spring.profiles.active}.${spring.cloud.nacos.config.file-extension}作为文件id,来读取配置。
本例中,就是去读取userservice-dev.yaml:
3)读取nacos配置
在user-service中的UserController中添加业务逻辑,读取pattern.dateformat配置:
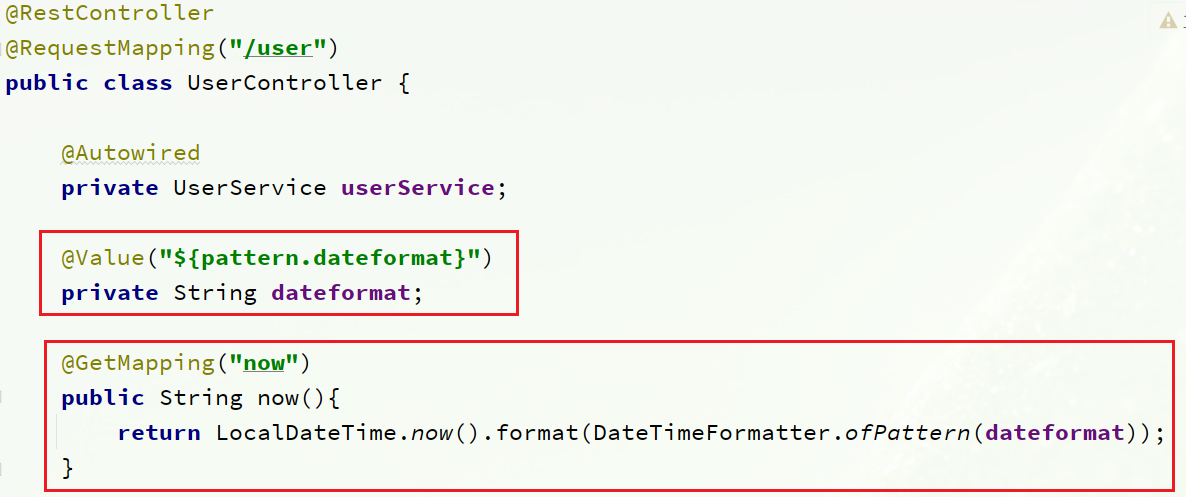
完整代码:
package cn.itcast.user.web;

import cn.itcast.user.pojo.User;
import cn.itcast.user.service.UserService;
import lombok.extern.slf4j.Slf4j;
import org.springframework.beans.factory.annotation.Autowired;
import org.springframework.beans.factory.annotation.Value;
import org.springframework.web.bind.annotation.*;

import java.time.LocalDateTime;
import java.time.format.DateTimeFormatter;

@Slf4j
@RestController
@RequestMapping("/user")
public class UserController {

    @Autowired
    private UserService userService;

    @Value("${pattern.dateformat}")
    private String dateformat;

    @GetMapping("now")
    public String now(){
        return LocalDateTime.now().format(DateTimeFormatter.ofPattern(dateformat));
    }
    // ...略
}
在页面访问,可以看到效果:

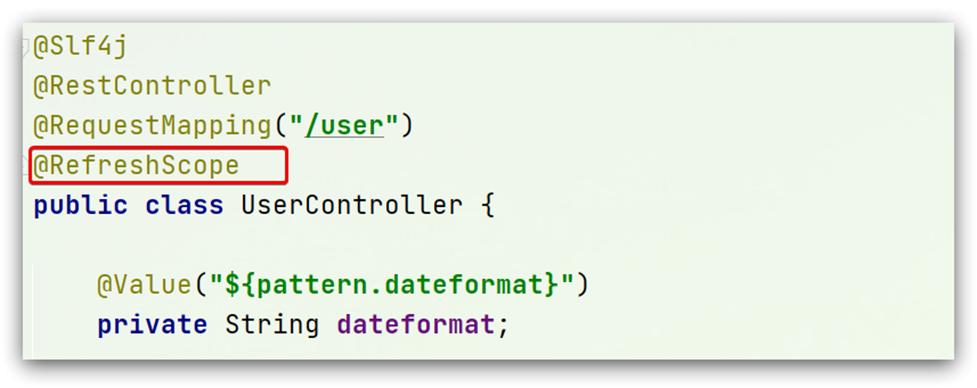
2.2 配置热更新
我们最终的目的,是修改nacos中的配置后,微服务中无需重启即可让配置生效,也就是配置热更新。
要实现配置热更新,可以使用两种方式:
2.2.1 方式一
在@Value注入的变量所在类上添加注解@RefreshScope:
2.2.2 方式二
使用@ConfigurationProperties注解代替@Value注解。
在user-service服务中,添加一个类,读取patterrn.dateformat属性:
package cn.itcast.user.config;

import lombok.Data;
import org.springframework.boot.context.properties.ConfigurationProperties;
import org.springframework.stereotype.Component;

@Component
@Data
@ConfigurationProperties(prefix = "pattern")
public class PatternProperties {
    private String dateformat;
}
在UserController中使用这个类代替@Value:

完整代码:
package cn.itcast.user.web;

import cn.itcast.user.config.PatternProperties;
import cn.itcast.user.pojo.User;
import cn.itcast.user.service.UserService;
import lombok.extern.slf4j.Slf4j;
import org.springframework.beans.factory.annotation.Autowired;
import org.springframework.web.bind.annotation.GetMapping;
import org.springframework.web.bind.annotation.PathVariable;
import org.springframework.web.bind.annotation.RequestMapping;
import org.springframework.web.bind.annotation.RestController;

import java.time.LocalDateTime;
import java.time.format.DateTimeFormatter;

@Slf4j
@RestController
@RequestMapping("/user")
public class UserController {

    @Autowired
    private UserService userService;

    @Autowired
    private PatternProperties patternProperties;

    @GetMapping("now")
    public String now(){
        return LocalDateTime.now().format(DateTimeFormatter.ofPattern(patternProperties.getDateformat()));
    }

    // 略
}
2.3 配置共享
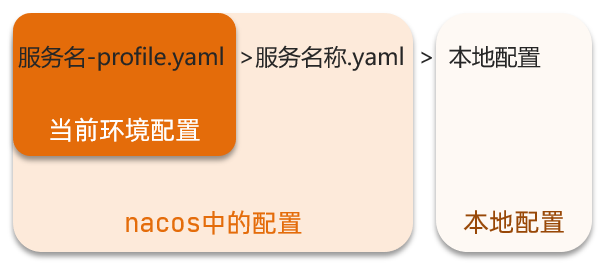
其实微服务启动时,会去nacos读取多个配置文件,例如:
[spring.application.name]-[spring.profiles.active].yaml,例如:userservice-dev.yaml[spring.application.name].yaml,例如:userservice.yaml
而[spring.application.name].yaml不包含环境,因此可以被多个环境共享。
下面我们通过案例来测试配置共享
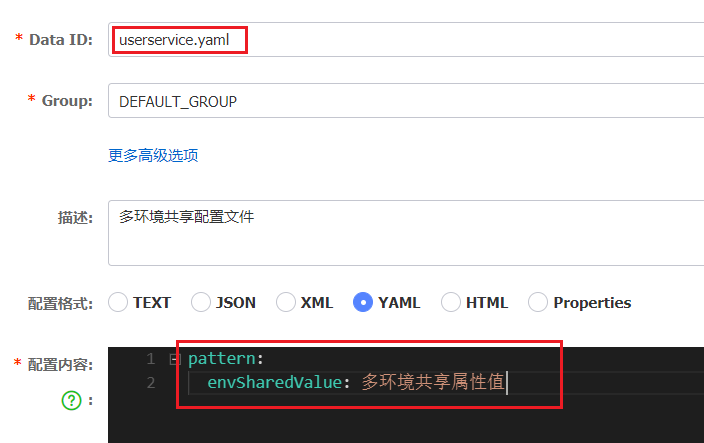
1)添加一个环境共享配置
我们在nacos中添加一个userservice.yaml文件:
2)在user-service中读取共享配置
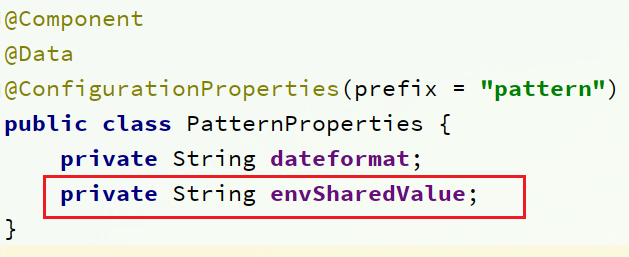
在user-service服务中,修改PatternProperties类,读取新添加的属性:
在user-service服务中,修改UserController,添加一个方法:

3)运行两个UserApplication,使用不同的profile
修改UserApplication2这个启动项,改变其profile值:

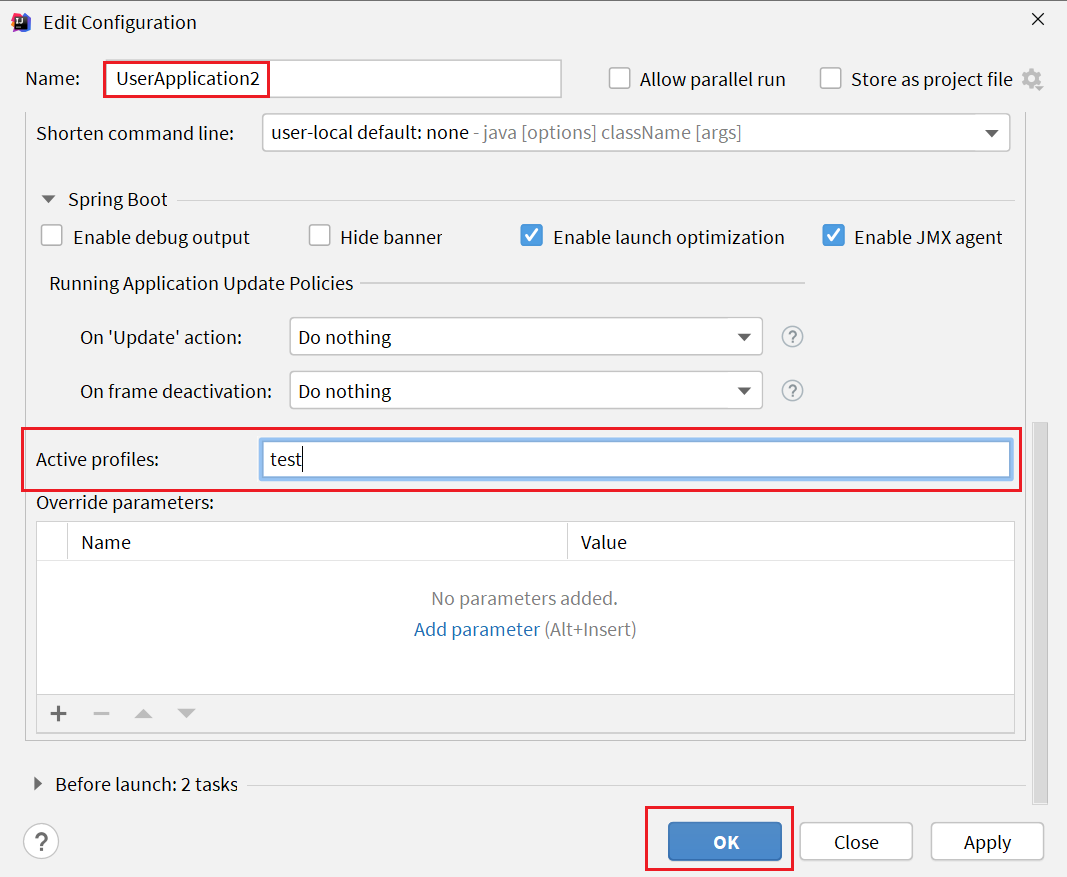
这样,UserApplication(8081)使用的profile是dev,UserApplication2(8082)使用的profile是test。
启动UserApplication和UserApplication2
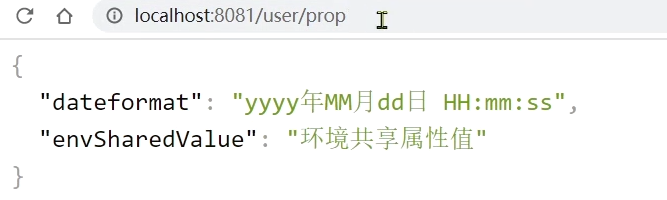
访问[http://localhost:8081/user/prop],结果:
访问[http://localhost:8082/user/prop],结果:
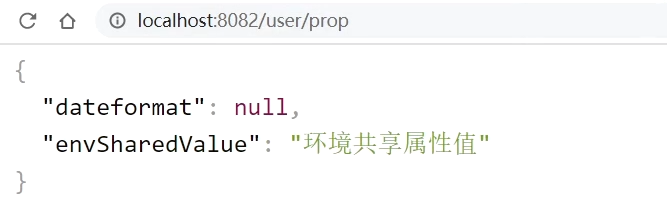
可以看出来,不管是dev,还是test环境,都读取到了envSharedValue这个属性的值。
4)配置共享的优先级
当nacos、服务本地同时出现相同属性时,优先级有高低之分:
2.4 搭建Nacos集群
Nacos生产环境下一定要部署为集群状态,部署方式参考课前资料中的文档: